Showing posts with label House Remodel. Show all posts

Thursday, July 9, 2009

The Kitchen

Jere worked really hard on installing our countertops, putting in new plumbing and disposal for our sink and many other things. The end result is a kitchen I love! I want to thank God, Jere, my hormones etc. for getting this kitchen to the point of being usable and functioning...

This picture may not seem like much but it's such a huge part of our kitchen. It's a flooring transition piece from wood to tile. It's the little things that blow me away...


This is the vanity that I painted and put feet on. We cut the counter to fit the cabinet because the depth is not a standard counter top depth. It's perfect for the spot though because it's in a semi tight hallway area which leads you to the back part of the kitchen.


Here, you can see the feet better.


Because we cut the counter top short to fit the depth of the cabinet, we had to be creative about the backsplash. It doesn't match the other counters but since this area is a little different we decided it was okay that the back splash wouldn't match the other ones. Jere cut a piece of trim and mitered the edges. I really like it.


If you walk by the vanity through the semi tight hallway area you can see the pantry. Everything is all put away and organized :)


This is one of two light fixtures that I bought 1 year ago from this past spring give or take a year or so. Basically they've been sitting in our attic ready to be in our kitchen but we've had other things to do...Including but not limited to: getting pregnant and waiting till I'm seven months pregnant to install it.


This is the view of our kitchen from the entry point. (I call it "the front part of the kitchen")


Jere installed a new to us sink that I bought for $30 off of craigslist as well as this faucet I found on overstock.com for $56 with free shipping. The faucet gave us some water pressure issues at first but it's better now.


While messing with the sink install and removal we discovered some issues with our disposal. One issue was that it was nasty and old. Another issue was that the guy at Home Depot told us the existing disposal was made specifically for mobile homes. So we decided to buy a new one. I am so glad we did. I love it.


This is the area on your right as you enter the kitchen. Jere installed the cabinet on the far left that I found at Restore and painted white. He built the center shelf out of wood that I found at the Restore and painted white. He put up the bead board behind it all and installed that counter which houses our dishwasher.


This is our dishwasher. We found it on the curb at our friend's house and stole it away in the night...Once again, I am in love.


This is my favorite photo because it seems so cozy to me. I love our kitchen because it has storage space now and matching counters and COUNTER SPACE in general! All the trim is put in and while I still have a few spots to touch up with paint, WE'RE DONE!


Jere hung a hook for my apron as the nail that I tapped into the wall wasn't good enough...and if you like it, click here to find more cute things.

Wednesday, June 10, 2009

More Kitchen

While the kitchen progress seems to be coming along really slowly to me, I've realized that I might need to take pictures and document the process to remind myself of everything that has been done. Jere put up shelves in this cabinet that I bought at Restore.


He also put up shelves in that open middle area. One thing missing from this area is a piece of trim that will go on top of the cabinet that is on top of the microwave. Follow me? It will line up perfectly with the top of the middle shelf area so that it all looks like it's cohesive and not so disjointed. The trim is painted so hopefully it'll go up quick.


This is my favorite part of the kitchen right now. When we first talked about putting shelves in this area, Jere came up with the idea of using a piece of trim to brace the shelves. I was all for the idea but didn't quite understand what he meant when he was describing how the end that faced out into the kitchen would look. It was only after he put it up did I understand that he was talking about cutting a piece of trim and making the end have the same curves. He used a friends miter saw and put the corners together. I absolutely love this detail! Isn't it SO cute?!


One other thing that I can say about the kitchen right now is that there is trim along all of the walls. It's the only room in the house that now has finished trim along the floor.


Everything's moving along nicely, I just need to be patient and stop counting down till the baby is here, although it's so hard. We only have seven weeks give or take if he's earlier or later than his due date!

Monday, May 4, 2009

List Time

Last night I made a list of all the things we need to do to finish the house. I just want to make it clear that Jere asked for this so we know what needs to be done. I made it so that it's a step by step list of what needs to happen in order for other things to happen. It looks daunting but I will start out having faith that we can be done before school starts in August...Maybe our list will make you feel better about yours. :)

Work By Room


Kitchen

  1. Paint Vanity (replacing work table)
  2. Remove Corner Cabinet if Fridge is too Tall
  3. Install New Refridgerator
  4. Paint Trim in Kitchen (trim already up)
  5. Find/Paint Floor Trim
  6. Install Floor Trim
  7. Install Shelves & Cabinet Next to Microwave
  8. Finish Electrical for Dishwasher/Microwave
  9. Finish Plumbing for Dishwasher/Microwave
  10. Install Dishwasher & End Panels for Countertop
  11. Install Counter Tops (3 areas)
  12. Install Sink
  13. Install Faucet
  14. Install Light Fixtures (Located in Attic)
  15. Remove Gas Pipe Behind Stove
  16. Paint Ceiling?
  17. Fill Wall Anchor Holes
  18. Paint Filled Holes
  19. Fix Electrical in Back Part of Kitchen?
Front Bedroom
  1. Find Door, Closet, Floor Trim
  2. Prime/Paint Trim
  3. Install Floor Trim
  4. Install Door/Closet Trim
  5. Caulk All Trim
  6. Spray Paint Doorknob
  7. Install Doorknob
  8. Fix Mud Coating?
  9. Stain Vent Cover Same as Wood Floor (Espresso)
  10. Prime/Paint Built-In's
Back Bedroom
  1. Find Door, Closet, Floor Trim
  2. Prime/Paint Trim
  3. Install Floor Trim
  4. Install Door/Closet Trim
  5. Caulk All Trim
  6. Spray Paint Doorknob
  7. Install Doorknob
  8. Fix Mud Coating?
  9. Paint Ceiling
  10. Stain Vent Cover Same as Wood Floor (Espresso)
  11. Buy Curtains, Move Red Curtains to Baby Room
Living Room
  1. Find Floor Trim
  2. Prime/Paint Floor Trim
  3. Install Floor Trim
  4. Buy Trim for Vents (Quarter Round?)
  5. Buy Trim for Front Door Header
  6. Prime & Paint Door Header Trim
  7. Install Door Header Trim
  8. Fix Mud on Ceiling (Ceiling Hole) /Fix Other Mud Areas?
  9. Paint Ceiling
  10. Caulk Door Trim
  11. Paint Door Trim
Bathroom
  1. Caulk Floor Trim & Door Trim
  2. Paint Floor Trim
  3. Recaulk Bathtub/Surround
  4. Cut Hole For Vent, Put in Metal Vent Cover
Basement
  1. Shopvac Webs & Dirt
  2. Tear Down Room Walls
  3. Add A Light?
  4. Fill Cracks in Walls/Floor
  5. Paint Walls
Attic
  1. Bring One Box Down at a Time to go through/organize
  2. Install Fixed Attic Window/Check Other Window
  3. Install Light?
Front Yard
  1. Roto-till Roots on North Side of Front Yard
  2. Up Keep Front Yard (grass seed, water, mow)
  3. Remove Flower Bed Border on N Side of Porch and Seed w/ Grass (Spread Stones on N Side of House)
  4. Border Tree w/ Cobblestones and Mulch
Back Yard
  1. Remove Swing Set
  2. Build Steps Out from Back Door (Brick/Stone)
  3. Build Patio Out the Back Door (Brick/Stone)
House Exterior
  1. Buy Paint
  2. Prime Exterior of House
  3. Paint Exterior Trim
  4. Paint Exterior Walls
  5. Paint Porch


Work By Project
This is basically from the list above, just organized by project so that we don't end up doing the same thing four times such as painting trim.

Organize Trim
Kitchen, Front Bedroom, Back Bedroom, Living Room

Prime/Paint Trim
Kitchen, Front Bedroom, Back Bedroom, Living Room

Install Floor Trim
Kitchen, Front Bedroom, Back Bedroom, Living Room

Install Door Trim
Front Bedroom, Back Bedroom

Install Closet Trim
Front Bedroom, Back Bedroom

Caulk Trim After Installed by Room
Kitchen, Front Bedroom, Back Bedroom, Living Room, Bathroom

Spray Paint Door Knobs
Front Bedroom, Back Bedroom

Install Door Knobs
Front Bedroom, Back Bedroom

Stain Vent Covers
Front Bedroom, Back Bedroom

Fix Mudding on Walls
Front Bedroom, Back Bedroom, Living Room

Paint Ceilings
Kitchen, Back Bedroom, Living Room

Tuesday, April 28, 2009

Progress!

This past weekend I feel like we got a good amount done around the house. I've been wanting to accomplish these things but knew if I started on a project I would need several hours in one block of time. That just hasn't been happening lately but last Saturday I got motivated. It kept raining on and off but I took the shelves I needed to paint out to the porch anyways to prime them.
  • The weekend started when I cleaned out my closet and took 3 full bags of clothes to Branded on Thursday. I now have about $30 in store credit! I gave the rest of the clothes to my mom to go through. It feels so good to get rid of clothes I haven't been wearing since being pregnant and won't wear after I'm done being pregnant. I'm pretty sure that got me motivated for the weekend.
  • I got 6 shelves and the 9" cabinet that I bought primed with two coats of paint each. I got the final coats of paint done tonight.
  • I installed the bracing for the pantry shelving in the back part of our kitchen. I need to move one of the braces though because I forgot that I have a short shelf that will go on the top level.
  • I made a stick arrangement for the bare space on our wall where Jere's sculpture was before it got taken to the student art show. I like it because it's random and kind of wild.
  • I cleaned the porch so our house looks a little less ghetto (old screen door, cardboard box, stick pile, trash box etc) which made room for me to paint my shelves.
  • I rearranged the living room and got all of the tools out of our living space. I moved the TV cabinet into the living room and we've watched several movies on our TV since then. It's so much more comfortable!
  • Jere bought and installed mulch and cobblestone flower bed pavers to line the flowerbed I attempted to make a couple weeks ago. It looks so much better! He also bought grass seed and spread some around our yard. Hopefully it'll take to the ground.
  • Jere also bought and set up a reel mower and weed wacker. Since we don't have a place to store a gas mower we bought a reel mower so we can carry it to the basement. We were joking that even though we don't own a gas mower, we are now officially adults because we own a mower!
Jere has a few more plans and ideas for the front yard and instead of tackling both the front and back yards, we're focusing on the front yard this spring :) The back yard might wait till the fall. I also bought 4" feet for the bathroom vanity we're putting in the kitchen and I think it's going to work really well. I am feel really good about the progress we made and I'm looking forward to what I can get done this weekend!

Next up:
  • Sand vanity that's replacing the stainless steel work table in kitchen.
  • Prime and paint vanity, feet for vanity.

I need to post pictures soon. Hopefully I can get some taken.

P.S. Today I am 27 weeks along!

Friday, August 29, 2008

Blast from a Year Ago

Last fall we were trying to figure out a new layout for our bathroom and we did the initial drawing on grid paper. Somehow it was out and about floating around the house and it brings back so many memories! I did a final drawing on autocad but this just has more personality :)

Saturday, February 23, 2008

Relaxing is Nice

This makes me sigh with pleasure. See the clean table?
When you can relax in your own house, it is a blessing. Trust me. Tonight I cleaned up our living room and now it is clutter free. Maybe this doesn't seem like much - but when you go from this:
To this...It's a wonderful feeling. Now I'll just sit here and read Jere's post about throwing up underwater again.

Wednesday, February 20, 2008

Booya! The Kitchen Floor Is Done!!!!

It all started by tearing up the vinyl peel and stick tiles...This area of the kitchen is in the "back" part and was two inches lower than the "front" of the kitchen.


The peeling of tiles continued with another set of tile with a different design as well as tearing up the old wood floor underneath the "front" part of the kitchen. Thankfully, the "back" part of the kitchen had the tiles stuck to the subfloor so I didn't have to tear much up back there.


After tearing out the wood, I laid plywood in the "back" part of the kitchen to level it even with the "front" part of the kitchen. I ended up laying two layers of 3/4" plywood. I screwed the first layer to the subfloor and then screwed the second layer to the first layer.
Do I need to say anything about this?


After laying the plywood to level everything out, it came time for the hardi-backer board. I bought 1/2" backboard and laid it in all areas of the kitchen. This made the floor seem very together and seamless and level.


After leveling everything there was still a lot of work to be done...First I had to choose a tile pattern.

I guess I should explain what I did first. I work for an architecture firm that has an interior design side. They had a bunch of extra tiles and I was told I could take whatever I needed. I ended up buying four boxes of cheap neutral tile to blend things together and fill in the cracks. This should explain why there are so many different colors and sizes of tile.


The other pattern. Neither one seemed to work for me...So I went with something else.


I decided to fit a pattern together "organically". This just means that I started a "random pattern" (oxymoron I know) But anyways I laid out the beginnings of a pattern and then cut peices to specifically fit where I needed them to go.


So then, after I dry fit my tiles together, I started the mortar process. Because I dry fitted the tiles, I had to remove them to mortar. At first I had a panic attack and called Jere home from school because I couldn't remember my "organic" pattern...Oh it was very terrifying. He came home and helped me set up a system so I could remember the general layout. Here's the thing..I wasn't soo worried about the pattern as I was about fitting the already cut tiles back where they needed to go. It was very frightening to think about not remembering the order and therefore having to re-cut tons more tile. See why it would be so terrifying???


This is the pattern I laid in the mortar (without grout yet)


I bought the mix-on your-own mortar. I had to borrow a plug-in drill to use my paddle to mix the grout (I only have a battery operated drill and the battery died on me while mixing. I would love to own a corded drill sometime soon)


So this is what it looked like after I was done with the mortar process...Not done yet though!

I still had to grout all the joints.


Oh yeah, this is what you look like when you stay up till 3:30am laying tile...See that piece of hair sticking out of the top of my head? (just look at the top of my head) that formed from leaning over for about 7 hours... AHH!

I waited for the mortar to set and proceeded to grout. I chose a color called "earth". It's a nice brown color. I mixed the grout once again with the corded drill (I need to return that to my kind freinds...) When mixing mortar and grout, I have found that you don't need to measure. You just mix until it's a little looser texture than peanut butter.

To grout, you need a float and a bucket of grout.


This is the grout before I wiped it off of the tile. When filling the cracks, it is best to push it all over so that every crack and joint is filled. This means that you will wipe it off later (while there may be a better way to do this, I like pushing grout around).


To wipe the grout off the tile, I used a sponge. Actually I think it's a drywall sponge. It did the trick. My goal was just to get the main stuff off, not to make it look all clean and shiny just yet.


This shot is a little blurry, but you ge the idea right? See the nice brown grout between the tiles?? Believe me, it's a sight for sore eyes! Oh grout how I love you so...


Oh yeah and this is what your hands might look like when you're done sponging grout...if you ever tiled your kitchen and grouted it. If you don't see what I am talking about, my hands are just really wrinkly. And white.


So this is what it looked like after I was done grouting. But wait! There is one more step! It's very important to seal the grout so that it can resist stains. See that rectangular tile? It's porous and so the grout got into the holes. I think those types of tiles are my favorite from now on. The grout just gives it more character.


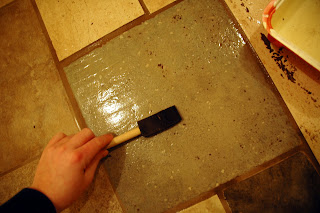
So, on to the sealing. I used TileLab "SurfaceGard Penetrating Sealer". Also I bought two brushes originally thinking "oh, i'll just wizz through this with one brush in each hand." Well it really didn't take long with one brush and it ended up being too complicated using two brushes...What a waste of $.49.

Basically, I just ran my brush over the grout lines. I did two coats and it was a good sight to see the second coat pooling up because that meant the first coat was already working to propell whatever might fall on it. I just let the second coat dry naturally and seep into whatever holes might be left.

I also sealed some porous stone tiles. I didn't have all that many but it was fun to look at them and think to myself "ah, they are sealed nice and tight."
So this is my kitchen floor in all it's glory. Leveled, backerboard, mortar, tile, grout and sealer. Seems simple, but somehow it took me like 3-4 weeks....How did that happen?! It was supposed to take me like a couple days... :)

Here are some glamour shots of my favorite areas. I love the small peices that fit together. Kind of like a mosaic.

OOO see that thin thin long strip?? I love it.

I have realized that while I love working hard and doing this type of thing, the biggest satisfaction is integrating whatever I've worked on into my life. I will now start walking on the floor and proceed to forget what hard work it was. Then later on I will think to myself, pppsshaw that project'll only take like a day I'll just jump right on that. Then, inevitably it'll take longer and my freinds and family will just smile, encourage me and try not to look like they think I'm crazy. (of course I really do feel crazy sometimes) But then when everything is done, I ALWAYS have this huge feeling of accomplishment and it is one of the best feelings in the world. That is what working hard is all about.

Wednesday, January 16, 2008

Now We Are 'Normal' Home Owners!

Jere has been working on plumbing (he put all new plumbing in our bathroom, by himself) and two nights ago he dry fitted the PVC to replumb our kitchen sink. After he dry fitted it, he went ahead and glued it together (got done at 12:45 AM). Sooo the end result is that my kitchen sinks don't look like this as they waited for me to wash them in the bathroom :) Now I just happily wash them away in the proper sink. Sounds silly and some people would be happy with any sink, but IT DID MAKE THE PROCESS LONGER to transport as many dishes I could carry to the bathroom and then transport them out again (several trips). I guess I could have just washed my face over a pile of dishes? NAH.

Anyways, as far as I am concerned we are now 'normal' home owners with small projects to do. Next up, leveling the kitchen floor, tiling the kitchen and building counters.