It all started by tearing up the vinyl peel and stick tiles...This area of the kitchen is in the "back" part and was two inches lower than the "front" of the kitchen.
The peeling of tiles continued with another set of tile with a different design as well as tearing up the old wood floor underneath the "front" part of the kitchen. Thankfully, the "back" part of the kitchen had the tiles stuck to the subfloor so I didn't have to tear much up back there.

After tearing out the wood, I laid plywood in the "back" part of the kitchen to level it even with the "front" part of the kitchen. I ended up laying two layers of 3/4" plywood. I screwed the first layer to the subfloor and then screwed the second layer to the first layer.
Do I need to say anything about this?
After laying the plywood to level everything out, it came time for the hardi-backer board. I bought 1/2" backboard and laid it in all areas of the kitchen. This made the floor seem very together and seamless and level.

After leveling everything there was still a lot of work to be done...First I had to choose a tile pattern.
I guess I should explain what I did first. I work for an architecture firm that has an interior design side. They had a bunch of extra tiles and I was told I could take whatever I needed. I ended up buying four boxes of cheap neutral tile to blend things together and fill in the cracks. This should explain why there are so many different colors and sizes of tile.

The other pattern. Neither one seemed to work for me...So I went with something else.

I decided to fit a pattern together "organically". This just means that I started a "random pattern" (oxymoron I know) But anyways I laid out the beginnings of a pattern and then cut peices to specifically fit where I needed them to go.

So then, after I dry fit my tiles together, I started the mortar process. Because I dry fitted the tiles, I had to remove them to mortar. At first I had a panic attack and called Jere home from school because I couldn't remember my "organic" pattern...Oh it was very terrifying. He came home and helped me set up a system so I could remember the general layout. Here's the thing..I wasn't soo worried about the pattern as I was about fitting the already cut tiles back where they needed to go. It was very frightening to think about not remembering the order and therefore having to re-cut tons more tile. See why it would be so terrifying???

This is the pattern I laid in the mortar (without grout yet)

I bought the mix-on your-own mortar. I had to borrow a plug-in drill to use my paddle to mix the grout (I only have a battery operated drill and the battery died on me while mixing. I would love to own a corded drill sometime soon)

So this is what it looked like after I was done with the mortar process...Not done yet though!
I still had to grout all the joints.

Oh yeah, this is what you look like when you stay up till 3:30am laying tile...See that piece of hair sticking out of the top of my head? (just look at the top of my head) that formed from leaning over for about 7 hours... AHH!

I waited for the mortar to set and proceeded to grout. I chose a color called "earth". It's a nice brown color. I mixed the grout once again with the corded drill (I need to return that to my kind freinds...) When mixing mortar and grout, I have found that you don't need to measure. You just mix until it's a little looser texture than peanut butter.
To grout, you need a float and a bucket of grout.

This is the grout before I wiped it off of the tile. When filling the cracks, it is best to push it all over so that every crack and joint is filled. This means that you will wipe it off later (while there may be a better way to do this, I like pushing grout around).

To wipe the grout off the tile, I used a sponge. Actually I think it's a drywall sponge. It did the trick. My goal was just to get the main stuff off, not to make it look all clean and shiny just yet.

This shot is a little blurry, but you ge the idea right? See the nice brown grout between the tiles?? Believe me, it's a sight for sore eyes! Oh grout how I love you so...

Oh yeah and this is what your hands might look like when you're done sponging grout...if you ever tiled your kitchen and grouted it. If you don't see what I am talking about, my hands are just really wrinkly. And white.

So this is what it looked like after I was done grouting. But wait! There is one more step! It's very important to seal the grout so that it can resist stains. See that rectangular tile? It's porous and so the grout got into the holes. I think those types of tiles are my favorite from now on. The grout just gives it more character.

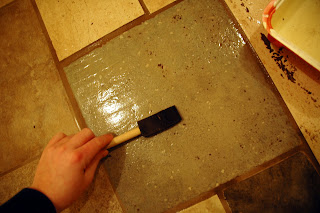
So, on to the sealing. I used TileLab "SurfaceGard Penetrating Sealer". Also I bought two brushes originally thinking "oh, i'll just wizz through this with one brush in each hand." Well it really didn't take long with one brush and it ended up being too complicated using two brushes...What a waste of $.49.

Basically, I just ran my brush over the grout lines. I did two coats and it was a good sight to see the second coat pooling up because that meant the first coat was already working to propell whatever might fall on it. I just let the second coat dry naturally and seep into whatever holes might be left.

I also sealed some porous stone tiles. I didn't have all that many but it was fun to look at them and think to myself "ah, they are sealed nice and tight."
So this is my kitchen floor in all it's glory. Leveled, backerboard, mortar, tile, grout and sealer. Seems simple, but somehow it took me like 3-4 weeks....How did that happen?! It was supposed to take me like a couple days... :)

Here are some glamour shots of my favorite areas. I love the small peices that fit together. Kind of like a mosaic.

OOO see that thin thin long strip?? I love it.

I have realized that while I love working hard and doing this type of thing, the biggest satisfaction is integrating whatever I've worked on into my life. I will now start walking on the floor and proceed to forget what hard work it was. Then later on I will think to myself, pppsshaw that project'll only take like a day I'll just jump right on that. Then, inevitably it'll take longer and my freinds and family will just smile, encourage me and try not to look like they think I'm crazy. (of course I really do feel crazy sometimes) But then when everything is done, I ALWAYS have this huge feeling of accomplishment and it is one of the best feelings in the world. That is what working hard is all about.